Section 5 Python Programming
Finally! We are going to start learning how to make the Raspberry Pi control components like lights and motors and receive input from sensors. This is what will make your creations become real robots. For this unit we will refer to the course programming text quite often. Many of the programming problems come from the Downey text as well. For all of your assignments in this section you will start here though. Learn the basic concepts of that assignment, read more about it on the course text, go to GitHub Classroom to practice the program and finally, transfer what you have learned to the Raspberry Pi.
Let’s get started by setting up the Pi and learning more about Python and it’s wide range of applications.
5.1 Setting up the Raspberry Pi
These procedures are for students in the Robotics Engineering course at Windsor High School. As such, some of the initial steps required in setting up a Raspberry Pi have already been completed. If you are using a new, out of the box, Pi refer to one of the many tutorials online.
Equipment Needed:- Raspberry Pi 3B+
- 5V | 2.5A power supply
- 32GB Micro SD card with pre-installed Linux based OS
- Monitor
- HDMI cable
- Keyboard
- Mouse
- Optional: Windows, iOS or Linux Computer (not a Chromebook)
- Connection to a LAN. In the lab this is “Mechlab”. At home it is your router.
NOTE: For the initial setup we will use the monitor, keyboard and mouse. Eventually, we will only use the command line functions which will allow you to eliminate those components and control the Pi from your laptop remotely if you choose. If not, you can use the Pi as a computer itself but just enter the command line controls of the Linux terminal. Eventually, you will need to be able to do this though as we will disconnect the Pi from all physical I/O devices and make it the brains of a self-sufficient robotic system.
5.1.1 Putting the Pi Together
To begin, assemble the Pi by putting the SD card in the slot. Connect the monitor to the HDMI port, and the keyboard and mouse to the USB ports. Plug in the power cord and turn it on.

(Create a custom background for the RPi and install all of the programs needed for the class.)
5.1.2 Controlling the Pi with SSH
For many, it may be easiest just to use the Raspberry Pi as a standalone computer. In order to do this one just needs to keep the Pi connected to a monitor, keyboard and mouse. One of the main advantages of this is that one can just turn on the Pi, wait for the boot sequence to finish and start programming using the terminal. Another advantage is that other programming interfaces may be used such as Notepad++ which has built in code highlighting and markup functions that make programming in Python, and other languages, easier. More advanced users might even choose to install an interface like PyCharm which has even more functions aimed at enhancing the programming experience and may be connected to Git or an online code repository like GitHub. Maybe the biggest advantage of programming from the Pi desktop environment is that a web browser may be easily used alongside the command line terminal or programming interface.
Eventually though, we will all need to sever our connection to the peripherals. Imagine trying to test out a mobile robot system with the monitor still attached. When we make the switch we start interacting with the Pi through SSH (Secure Shell). This concept is not as difficult to understand as one might think. Essentially you are accessing the terminal window for the Pi through another computer using a piece of software like Putty. When both devices are connected to the same router, this is a fairly simple process. While we will not require this yet, it is strongly recommended that every student go over this process which is detailed in the section titled [Controlling the Raspberry Pi Remotely] in the last chapter of this book sometime in the first semester. The Capstone project will require this so we might as well get used to it now. Most will probably switch back and forth between using the Pi as a desktop computer and accessing it via SSH.
5.2 The parts of the RPi and Pinout
Let’s examine the parts of this tiny computer that you will be using for the rest of the year…it is really quite amazing how much can be packed on the small device.
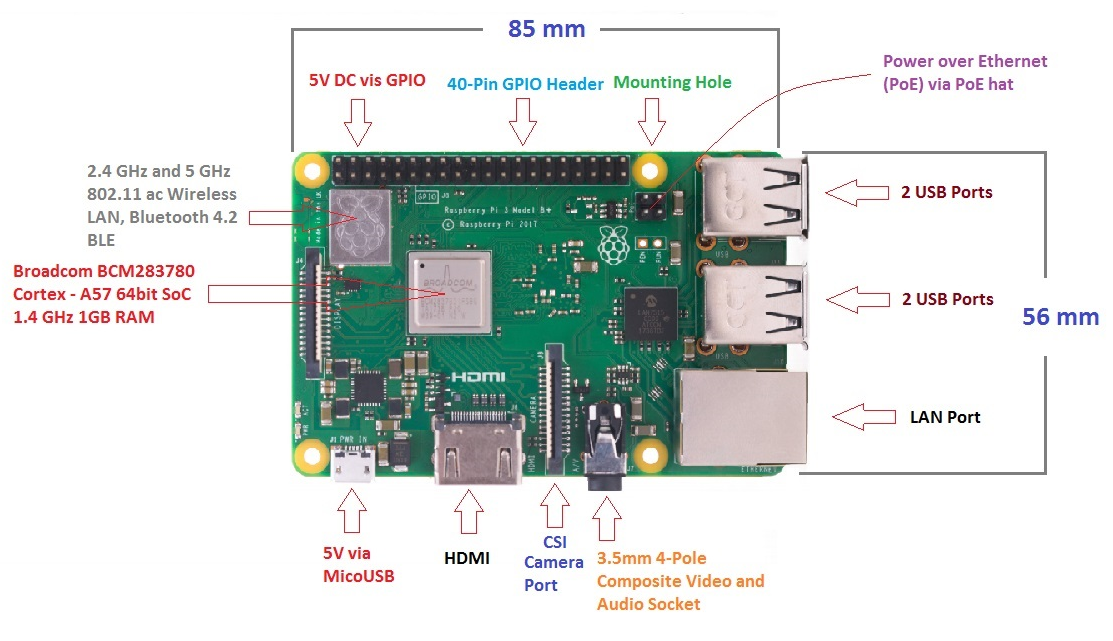
- While it is possible to power the device with a micro USB power supply that provides only 1A of current (older Android phones use this), it is best to use the full 2-2.5A power supply, especially when we start hooking up components to the GPIO pins
- Be careful not to short two GPIO pins together or connect an external DC power supply incorrectly to one of the GPIO pins. These actions can damage essential components of the Pi.
- TBC
A powerful feature of the Raspberry Pi is the row of GPIO (general-purpose input/output) pins along the top edge of the board. There are 40 pins which we can use for a wide range of robotics applications.

It is important to remember which pins are which as the locations do not represent the GPIO labels. If you forget or cannot find this diagram, use the command line in the terminal.
This is as good a place as any to start using the terminal. Before the introduction of the Apple Lisa with a graphical user interface (GUI), all computers used something like the terminal as the interface with humans. All computers still contain a terminal. The Raspberry Pi OS we are using is based on the Linux kernel so we will use Linux commands but the procedure is similar for other systems such as Windows and macOS. With the Raspberry Pi powered on press CTRL+ALT+T to open a terminal session.
After the terminal opens, type the following command: pinout
You should see something like this in the terminal:

Any of the GPIO pins can be designated (in software) as an input or output pin and used for a wide range of purposes. We will use them to send and receive electrical signals. Two 5V pins and two 3V3 pins are present on the board, as well as a number of ground pins (0V), which are unconfigurable. The remaining pins are all general purpose 3V3 pins, meaning outputs are set to 3V3 and inputs are 3V3-tolerant.
A GPIO pin designated as an output pin can be set to high (3V3) or low (0V). In addition pins GPIO12, GPIO13, GPIO18, GPIO19 may also be used with Pulse Width Modulation (PWM). A GPIO pin designated as an input pin can be read as high (3V3) or low (0V). This is made easier with the use of internal pull-up or pull-down resistors. Pins GPIO2 and GPIO3 have fixed pull-up resistors, but for other pins this can be configured in software.
It is possible to control GPIO pins using a number of programming languages and tools. For this course we will use Bash, the scripting language of Linux, and Python.
NOTE: Before you start your first programming assignment realize that in order to progress in this course you must fully learn the information in the text. If you skim or rush through you might be able to get many answers on the chapter quiz correct but you will miss many of the points. Programming is hard and learning to program is as well. It does not mean it is impossible. It just requires work. Take your time and make sure you are understanding what you read. If not, do the following:- Re-read the section.
- Ask someone else in the class for clarification.
- Google your question
- Ask your instructor
This is good advice for all courses, especially the further you go in school. Many of you will go so far in college that you basically stop taking classes and just learn on your own for the sake of understanding something.
Assignment 5.2
For this assignment you will learn some basic commands and functions in Linux and how to find out how to use them.
Open up a terminal on your Raspberry Pi as before.
Type the following:
help
This is a list of all the built in functions that come with this version of Linux. As you add more packages and create your own functions this list will get larger. If you scroll to the top your see this message:
Type 'help name' to find out more about the function 'name'.
Let’s try it. One of the functions you will use fairy often is cd.
help cd and answer the following questions from the information on the screen:
- In your own words that you understand, what does this function do? (You may need to Google some of the terms like “directory” to understand what that term means in Linux)
- If you type
cd Desktop what do you think will happen?
Now call up the help information for the function if.
Why would we ever use this function? Again, you might need to do a little research to understand the vocabulary here.
Write down or type your answers so we can discuss them in class next time.
5.3 Why Python?
It is worth spending a little time discussing the reasons why Python will be the chosen operating system for this course. Prior to Fall 2020, the course utilized the Arduino UNO as the microprocessor for the robotics systems. The Arduino is also a versatile, fully programmable microcomputer with input and output pins capable of producing and detecting low DC voltages. It utilizes the C++ programming language. There were a few limitations, however, with the Arduino UNO.
The biggest advantage of the Pi is the programming interface. Since the Pi is essentially a small Linux computer, applications and environments that function on Linux also function on the Pi. The default scripting language on Linux is called Bash. When you called up the pinout for the Raspberry Pi earlier, you were using Bash. It is a powerful command line interface. Why not just use Bash instead of learning another language within the Linux shell? The main reason for this is Python’s usefulness outside of this class. We know from past experience that almost all of our Robotics Engineering students will go on to some kind of technical field of study in college. While those do not all go in to robotics, they all need to learn new languages. Python is about the most useful language one can learn in high school if planning to go on to a technical degree in college like engineering, computer science, data science or machine learning as well as almost any natural science field of study. It is powerful, easy to learn and widely used. The most recent StackOverflow survey ranked Python 3rd most popular among users. By learning this language, you will be more prepared to take on the challenges of a field of study in college related to robotics. Since one of the main objectives of our program is to help students prepare for post-secondary STEM fields of study, Python is an easy choice.
Python is also an interpreted language instead of a compiled language. What is the difference? In order to get a compiled language to run on a computer, the additional step of compiling it into machine code must take place before the device will run the commands of the program. With an interpreted language, a program or virtual machine running on the device (In this case, the Python environment installed on the Raspberry Pi OS) interprets the script written by the programmer directly into machine code. This is a faster process than running a compiled language like C++. Other interpreted languages include Ruby, Java and Perl and good old BASIC (Which many of us adult programmers learned when we were younger on our Commodore 64 or Apple IIe computers). This structure makes Python faster to learn.
There are other advantages to the switch to the Pi. The first advantage that the Pi has over the UNO is an onboard wireless internet connection. The Pi can connect to other devices using either 2.4GHz or 5GHz frequencies as well as Bluetooth. The current version also includes a Power over Ethernet (PoE) capability. Making the switch to the Raspberry Pi will allow for more seamless IOT (Internet of Things) activities without the need for an additional board. Second, the Raspberry Pi can actually function like a computer. We can modify the OS easily by modifying the micro SD card used as RAM on the computer.
5.4 Hello, World…and a Little More
It is a tradition in in programming to test out one’s ability to program in any language by creating a program called “Hello, World!”. This dates back to 1974 at Bell Labs. The actual C language code that was written was:
main( ) { printf("hello, world\n"); }
In our case, we will do something very similiar. The first program we write will do the same as that one written in 1974. Open a terminal window by pressing CTRL+ALT+T. This will open a window that looks like this:

In order to run a command in Python through the terminal we need to set up the Python environment. Type this command into the terminal:
python3
This will show a message like this:

You know that you are able use Python commands when you get the >>> prompt. This is universal for all Python editors and the specific prompt for Python. We will try two methods of the “Hello, World!” program. First, we will use the print command. Type the following command into the interpreter:
print ("Hello, World!")
The quotation marks signify that we want to literally display what is directed by the print statement. Try it without the quotes to see what happens. This should produce something like this:

This is your first error message.
Assignment 5.4
Read the chapter from our text titled, “Chapter 1 - The way of the program”. While you read the chapter open the Python environment through the Linux terminal on your Raspberry Pi as before. Follow along with the examples from the text as you go. This will help you learn Python more quickly. When you are done reading the chapter complete exercises 1 and 2 at the end of the chapter on your own to make sure you understand what you read. If not, see the Note above.
5.5 Functions
As our text states,
In the context of programming, a function is a named sequence of statements that performs a computation. When you define a function, you specify the name and the sequence of statements. Later, you can “call” the function by name.
Let’s take a look at this sequentially:
First, define a function. Second, call the function.
What does this look like?
Open the Python environment window and define your function like this:

Then we call the function like this:

So, what happened here? We defined the function say_hello() . Then, we called the function and passed a parameter into the function. Can you tell what the parameter is?

Why do we need to know how to use functions?
The first reason is that the standard Python 3 library is filled with functions. When you type the command print ("Hello, World!") you are calling the built in Python print() function. As you read through the chapter on functions you will see that there are many other examples of useful functions packed into Python.
The second reason is to make your programs easier to use. For example, let’s say you make a robot that needs to follow this pattern as it drives alone a course. There are many reasons why you might need to do something like this. Maybe the problem to solve is navigating around obstacles. Maybe the robot needs to map a facility that humans cannot get into because of hazardous conditions like radiation. Maybe your robotics teacher just wants you to demonstrate you can use functions. At any rate, functions will make your job as a programmer eaiser. Here is the path the robot will take:

How many times does the robot need to make a 90 degree left turn? (nine) Here is an example of how we could execute that turn using Python and our Raspberry Pi (Don’t worry about the syntax now, we will get there.)

As you will learn, there are other commands that need to be used to set up this program but these four lines are what actually make the Raspberry Pi control the left and right wheels of the robot so that the right wheel moves forward for two seconds while the left wheel stays fixed. This will make the robot turn left. If the two seconds is the correct amount of time, it will make a 90 degree turn.
Think about writing the program to just make the robot drive around. You would need to replicate this code nine times. You probably would not retype it nine times. Instead you would copy and paste it. This is known as brute force programming. There are many reasons not to do this. The biggest reason has to do with the third line in our left turn program. What if two seconds is not exactly right? If that is a slight overturn then the robot will go off course with every turn which means we need to go back in and change that value on every sleep() function. What if the battery on the robot is at a different charge level from one day to the next? Again, we will need to change nine lines of code. Remember, we humans are not very good at repetitive tasks. That is what we use computers for - to do things over and over. Why not let the computer do the repetitive stuff?
Instead, let’s make a function called left_turn() like this:

And call it nine times throughout the program with the command left_turn(2) . If we found that it actually takes three seconds instead of two to execute a 90 degree turn then we would just need to change the parameter we pass to the function, represented by the variable sleep_time.
In that case, the call would look like this: sleep_time(3). We could even make things simpler yet by defining a variable at the beginning of the program to represent the number of seconds we want to sleep during the turn - something like turn_sleep_time = 2 . Then, we would call the function like this:
left_turn(turn_sleep_time)
Now, every time we change the variable turn_sleep_time we are changing the parameter passed to the function everywhere in the program. We have gone from changing nine different lines of code to changing just one. This gets really impressive when we think about all the right turns we have to make as well. See how functions are an integral part of robotics? Every modern programming language uses functions. Once you learn it for Python you can use it in other languages as well with only minor changes to syntax.
If we write programs that need to repeat a process nine times, functions save us a lot of work and potential errors. If we need our robot to do something nine hundred times or nine million times we have to use them. Now let’s spend some time learning more about the functions built in to Python using our text:
Assignment 5.5
Read the chapter from our text titled, “Chapter 3 - Functions”. While you read the chapter open the Python environment through the Linux terminal on your Raspberry Pi as before. Follow along with the examples from the text as you go. This will help you learn Python more quickly. When you are done reading the chapter complete exercises 1, 2 and 3 at the end of the chapter on your own to make sure you understand what you read. If not, see the Note above.
5.6 Conditionals
Besides completing repetitive tasks for us humans, robots need to be able to make decisions based on the condition of their environment. Later, we will learn how to use sensors to understand what is happening in a robot’s environment. First, we will learn how conditional statements work in Python. If you have not already done so, it might be helpful to get a little background on computer logic. The inventor of the logical system we use in robotics was George Boole. There is a video in the Supplemental Videos section of this book about his contributions to the field.
For now, we will concern ourselves with some basic logical or Boolean operators. These are different than mathematical operators. When we write the following statement using mathematical operators:
x = 6
we are making a statement that the variable x is equal to the integer 6. By contrast, when we use the same operator (=) in logical math we are asking “Is one equal to the other?” We script that questions like this:
x == 6
Notice that we use 2 = signs instead of one. This is not a typo. In fact, it is universal across many programming languages. Instead of declaring x is equal to 6, it is asking Is x equal to 6? What are the possible answers to this question? For the answer, read section 5.2 of our text.
Notice that there are many other logical (aka relational) operators. We can use these operators which return a value of true or false to help our robots make decisions. To do this we use functions like theif() statement. Let’s try it out using another Python function len(). We will create a function that determines if a word is longer than seven letters. If so, a message will be displayed saying so. If not, a different message will be displayed. Before you read how to do this, see if you can figure it out. Follow these steps using the textbook as a guide:
- Define your function and pass a parameter through that is the word you are going to test.
-
Write a conditional statement using the
len()Python function to determine the length of the word. -
Use the
print()function to return a statement that says if it is or is not a long word (greater than seven letters long). - See if you can include the word in the message returned by the function
Here is one way to do it:

Notice that we pass the word to the function by using the parameter word which then stores the string representing our word as a variable. The if statement checks the length of the word using the len() function which returns an integer equal to the number of alphanumeric characters in a string (our word). If that value is greater than or equal to nine, one message is printed. Since the only other possibility for the length of this word (if it is not greater than or equal to nine) is that it is less than nine letters, we can use the else function to print a different message. Try it out now by typing this function into the terminal under the Python environment and calling the function using different words. You will probably get some “Traceback” errors the first time you do but stick with it. When you are done compare your result to the results below:

Think of the possibilities now. What could your robot do with this new power! If we go back to our example in the previous section in which our robot had to navigate around obstacles by turning 90 degrees at a time we can see some interesting solutions. If we could use a compass sensor to determine the angle of our robot in relation to magnetic north, we could use conditional statments to turn the robot. Instead of trying to figure out exactly how long it takes for the robot to turn 90 degrees, we could write a script that waited until the angle in relation to magnetic north changed by 90 degrees. We could even do this with one function. It might look something like this:

This is a lot to take in for a new programmer so let’s briefly go over this function. When it is called we put in a value for direction. The possible correct values are “left” and “right”. If the direction is “right” the left wheel moves until the angle of the robot is equal to the desired angle. If “right” is passed to the function the opposite happens. Just in case the human mispells the word or puts something else in a third print statement is used to tell them that their input is not valid. We will get to this process later in the course.
Assignment 5.6
Read the chapter from our text titled, “Chapter 5 - Conditionals”. While you read the chapter open the Python environment through the Linux terminal on your Raspberry Pi as before. Follow along with the examples from the text as you go. This will help you learn Python more quickly. When you are done reading the chapter complete exercises 1, 2 and 3 at the end of the chapter on your own to make sure you understand what you read. If not, see the Note above.
5.7 Iteration
There are many reasons to use iteration in programming. The most straightforward reason is to do a spedified action a certain number of times. Imagine you are designing a robotic NASCAR driver. This would be the perfect place for iteration. In a NASCAR race the driver makes the same left turns hundreds of times. Considering one of the advantages of robots is that they can perform tasks that humans find boring or too repetitive, our robot NASCAR driver would thrive in this environment making the same left turns over and over for hours.
We will approach iteration by learning two programming concepts: for loops and while statements. Each is useful in various situations. Sometimes they are interchangable depending on the problem being solved. One uses Boolean logic and the other does not. Let’s start with the for loop.
5.7.1 for Loops
Unitl now, everything we have done, we have done once. Most of the time though, our robots will need to do things repeatedly until a desired outcome is reached. An example could be that our robots collect data from a website over the course of several hours. One of my home automation projects was to build a solar powered garden watering system for my wife’s garden. This is very much a robotics application as we wanted to make sure water is delivered consistently every day even when we were gone on vacation. One of the challenges though was that sometimes it rains in the summer, ususally at night. If it rains enough the night before there is no need to water the next morning. As humans we would just think, “How much did it rain yesterday (if it did at all)?” and make our decision to water that morning. A robot needs clear rules though to follow. In this case, after a lot of trial and error, I decided that it was best to check the weather conditions between 4:00 pm and the time the watering system came on in the morning. That way, if enough rain had fallen there was no need to water the garden. I decided to check the weather forcast using openweathermap.org. Every 15 minutes between 4:00 pm and 8:00 am the Raspberry Pi would “scrape” the current weather data off the website, “parse” out the current weather condition and record it in a csv file. To do this I used something that looked like this:

Don’t worry too much about the details of this function called collect_weather(). Instead focus on the line that begins with the word for. This is one way to use a for loop to iterate a process (checking the weather). I know that I want to check the weather over the course of 15 hours every 15 minutes (four times an hour). This loop will start at 4:00 pm and run 60 times. During the loop, the Pi checks the weather and records the data in a file then sleeps for 15 minutes (900 seconds). This is a very complicated script so let’s try something simpler using our Raspberry Pi and the Python environment.
Open a ternminal and start the Python environment as before. Type the following lines:

This for loop will count to five, updating the value of x each time and print x. Try it out by hitting enter to get this result:

Notice that, while the loop ran five times, the value of x was not five at the end. You can see why. In computer science we generally start counting at zero instead of one. As a result the range() function used in a for loop ends its final iteration at one less than the value passed to the function, in this case four instead of five. Remember this for future scripts.
There are other ways to use for like iterating over lists. We will get to those later in our course. For now, explore this method by completing the next assignment.
Assignment 5.7.1
Read sections 1-3 of chapter 4 from our text. While you read the chapter open the Python environment through the Linux terminal on your Raspberry Pi as before. Follow along with the examples from the text as you go. This will help you learn Python more quickly. When you are done reading the chapter complete exercises in section 4.3 on your own to make sure you understand what you read. If not, see the Note above.
5.7.2 while Loops
Our last introductory programming concept is a different kind of loop. Sometimes, the programmer does not know how many iterations will be necessary to solve the problem. For example, from the previous description of a Raspberry Pi based watering system for a garden, I did not know when I would stop using the system. At the end of the season after the first freeze we would have no more need to water. At that point, we would just shut it down and take the electronics in for the winter. Until then, I needed it to keep going. As a result, I used one of the simplest loops which is written like this:
while True:
while loops run as long as the condition being tested is true. In this case, I am saying do everything in the loop as long as true is true. This will be true forever (or until I unplug the Raspberry Pi for the season). There are many other ways to use while loops but the basic concept is the same - keep doing these things until the condition is no longer true. For example, let’s say you are building that robotic NASCAR system mentioned earlier. If you wanted to keep the car going until the end of the race you could say something like this:

This extremely oversimplified script basically says, we start the race at zero laps. if we do something that means we have completed a lap, add one to the total laps. So, after the finish line is crossed the first time, laps gets increased by one. while laps is less than or equal to 500 (the end) keep driving.
To understand this more, complete the next assignment.
Assignment 5.7.2
Read the chapter from our text titled, “Chapter 7 - Iteration”. While you read the chapter open the Python environment through the Linux terminal on your Raspberry Pi as before. Follow along with the examples from the text as you go. This will help you learn Python more quickly. When you are done reading the chapter complete exercises 1 and 2 at the end of the chapter on your own to make sure you understand what you read. If not, see the Note above.