Section 9 Course Materials and Instructions
9.1 Course Lecture Notes
9.1.1 Introduction
9.2 Using GitHub
For this couse we will store all Python and Bash scripts on GitHub. This will alllow us to utilize the version control system Git and work from an online repository instead of storing all code on a single device. In doing so, you will be able to collaborate with others more easily and use multible devices on the same project such as a PC at school, a Mac at home and a Raspberry Pi that travels with you.
9.3 Think Python Textbook
Our course programming text is called Think Python by Allen B. Downey. It will most likely be easiest to use the HTML version but there is also a PDF download at the site as well.

9.4 All About Circuits Textbook
Our course electronics text is Volume I of All About Circuits. This online text will focus on Direct Current (DC) electricity.

9.5 OnShape Account Setup
OnShape offers a powerful online CAD solution. Students in secondary education can receive a free student account which includes all of the features of the paid account and the learning center. This makes it an outstanding CAD alternative.

Go to the OnShape website to sign up for a free account. Think about the email address you want to use. If you use your school email address it may be more convenient for now but you will lose access to that email as soon as you leave WHS and that could make it more difficult to access any projects on the OnShape account that you might like to maintain.
9.6 Controlling the Raspberry Pi Remotely Over Wifi
Using a remote shell, one can control a Raspberry Pi with another computer. We have been doing this through the wired USB connection which has its own IP address over USB. The difference between the wired connection and using wifi is that there is no wire necessary. Both the Pi and the computer are connected to the same wifi but not directly to each other. Control may use the linux command line or with a GUI using a service like Tight VNC.
Learning how to do this will allow our robots to become less tethered to a specific location. This concept, more broadly is known as the Internet of Things (IoT). Devices with internet connections can interact with one another over that connection. Many of you probably already have some IoT devices in your homes like thermostats that interact with each other to maintain the most energy-efficient comfort in your house or security cameras that may be accessed on a mobile device from anywhere. In short, our robots will not be fully robots until we learn to do this. As a result, the Capstone project for this course in semester two requires this.
In all cases one thing is assumed. The Raspberry Pi and the device using the Secure Shell are connected to the same router. In our lab, we will use the MechLab wifi network. At home, students will need to make sure to connect the pi to their home router which the computer is using.
TAKE NOTE!
The Raspberry Pi cannot connect to all types of wifi networks. In places like schools and offices it is common for WPA2 enterprise networks to be in use. At WHS, the “waccess” and “wchrome” networks are both this type. These networks have an extra layer of security to them. What this means for you, is your device needs a digital certificate identifying it as your device and you as a registered user. This cannot be done with a Raspberry Pi. As a result we cannot use those networks. Instead, we will use the “mechlab” network while in school in most cases. You may also use the “wsdguest” netword to connect at school but SSH is more challenging with that network.
9.6.1 Setting up SSH for Chrome OS
Using SSH with a wireless connection will work on your Chromebook with only one slight modification to the IP address you use with your SSH application. To accomplish this, rather than use the IP address to the tethered device, you will find IP address of the Raspberry Pi after it is connected to a local network. Follow these steps to complete this process:
- Get the network ID and passphrase for the network you would like to use. In the lab, I will provide you with the passphrase for the “mechlab” network. If you are trying to do this at home or somewhere else you can follow these expanded instructions in order to identify your network and set up your connection.
- From the terminal, open the
wpa-supplicantconfiguration file in nano:
sudo nano /etc/wpa_supplicant/wpa_supplicant.conf
This opens a file that looks like this in the nano editor:

wpa_supplicant.conf is a configuration file for wpa_supplicant, a piece of software used to implement WPA and other security protocols that WiFi networks implement. It is used to create a “headless” configuration on the Raspberry Pi.
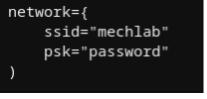
- Add these lines of code to the bottom of the file:
- Type
ctrl + x, answer “y” and save the file.
If you restart the Raspberry pi, it should connect to the wifi network. to make sure, let’s check the connection.
Sign back into the Pi using the SSH client application and the previous IP address.
Use
ifconfigcommand to determine the IP address of the Pi. Look at the section title “wlan0”. The “inet” address is what we want. See below:

ifconfig.
- Finally, connect to the Pi using this IP address in the SSH client application instead of the USB IP address we have been using in class. As long as the Pi is on the same wifi network as your Chromebook, you will not use the USB connection to the Chromebook. You may use a separate power supply and it will still connect.
If neede, this process may also be done with a PC, Mac or Linus computer. It is most likely that you will be doing this with a PC so those directions are detailed below.
9.6.2 Setting up SSH for Windows
Complete the following steps to create a secure shell connection with a computer running Windows:- Be sure the Raspberry Pi is turned on and connected to router.
- Be sure the computer is connected to the same network.
- Repeat the process detailed in step 6 in the section above to find the IP address of the Pi.
-
Make a note of this address, this is the address of the Pi on the network. The computer will also have an ip address on the network. To see that address open Windows PowerShell and type
ipconfig. The “IPv4 Address” is the address of the computer. If both are on the same network, the first three numbers should be the same. If not, they are not connected to the same network and a SSH connection cannot be made. - Download and install Putty (Most will choose the 64 bit Windows Installer file).
- Open Putty.
- In the “Host Name (IP address)” box, type in the address of the Raspberry Pi.
- Click “Yes” at the warning.
- Enter the username and password for the device.
You are now connected to the Pi via SSH to the command line.
If you would like to set up a graphical user interface (GUI) for use with SSH you can try using TightVNC. This HowToGeek Guide shows you how to do it.
9.6.3 Setting up SSH for Mac or Linux
In case you need to use Mac or Linux for your host computer, the process is very similar for each. Follow this guide to set it up.
9.6.4 What to do if Your Raspberry Pi Needs a New OS
There may be a situation where you need to replace the operating system (OS) on your Raspberry Pi. This could happen for any number of reasons.
- You lost the SD card
- The SD card is damaged
- You have made some changes to the OS which need to be reversed back to the original state
Note - If you follow the steps here, your Pi will be just like the day you received it. All work will be lost. Luckily, if you have everything on GitHub, your code should still be there.
To replace your image follow the steps found here. Jump down to the section titled, “How to Restore Your Raspberry Pi Project”. The image for the Pi may be found in this directory. Download it and use it as your image file. You will need an SD card adapter and access to a computer with imaging software like Win32 Disk Imager.